如何通过专线网络实现跨境办公?

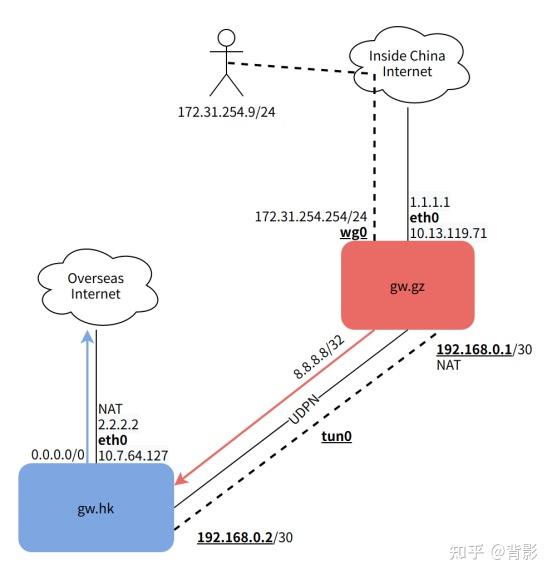
全网以两台ubuntu20.04 server为核心。gw之间通过gre协议建立L3 Tunnel,在此基础上通过路由和NAT,实现从境内到境外互联网访问加速。
1. 准备工作
1. 广州、香港各准备一台云主机,绑定EIP,用UDPN打通内网
参考文档:https://docs.ucloud.cn/udpn/guide
2. sudo vim /etc/sysctl.conf,修改如下参数,使其支持路由和L3转发能力
| Shell # route net.ipv4.conf.all.forwarding = 1 net.ipv4.conf.default.forwarding = 1 net.ipv4.conf.all.rp_filter = 0 net.ipv4.conf.default.rp_filter = 0 net.ipv4.ip_forward = 1 |
3. 执行sudo sysctl -p使上述参数立即生效
2. 组网
2.1 建立tunnel
如架构图所示,gw之间通过gre协议建立L3 Tunnel,实现L3直连。
| Shell gw.gz# sudo ip tunnel add tun0 mode gre local 10.13.119.71 remote 10.7.64.127 ttl 255 gw.hk# sudo ip tunnel add tun0 mode gre local 10.7.64.127 remote 10.13.119.71 ttl 255 |
2.2 配置互联
| gw.gz# sudo ip address add 192.168.0.1/30 dev tun0 gw.gz# sudo ip link set tun0 up gw.hk# sudo ip address add 192.168.0.2/30 dev tun0 gw.hk# sudo ip link set tun0 up |
2.3 验证
| Shell gw.gz# ping 192.168.0.2 PING 192.168.0.2 (192.168.0.2) 56(84) bytes of data. 64 bytes from 192.168.0.2: icmp_seq=1 ttl=64 time=6.14 ms 64 bytes from 192.168.0.2: icmp_seq=2 ttl=64 time=6.06 ms 64 bytes from 192.168.0.2: icmp_seq=3 ttl=64 time=6.13 ms ^C --- 192.168.0.2 ping statistics --- 3 packets transmitted, 3 received, 0% packet loss, time 2003ms rtt min/avg/max/mdev = 6.055/6.109/6.144/0.039 ms |
3. 测试路由配置
gw.gz将8.8.8.8的下一跳指向tun0 gw.hk。
| Shell gw.gz# sudo ip route add 8.8.8.8/32 via 192.168.0.2 dev tun0 |
gw.gz在从tun0 出包时,nat成tun0接口的地址。
| gw.gz# iptables -t nat -A POSTROUTING -o tun0 -j MASQUERADE |
gw.hk在从eth0出包时,nat成eth0的接口地址。
| gw.hk# iptables -t nat -A POSTROUTING -o eth0 -j MASQUERADE |
验证
| Shell mtr -nr -c 1 8.8.8.8 Start: 2023-03-16T22:07:51+0800 HOST: 10-13-119-71 Loss% Snt Last Avg Best Wrst StDev 1.|-- 192.168.0.2 0.0% 1 6.2 6.2 6.2 6.2 0.0 2.|-- ??? 100.0 1 0.0 0.0 0.0 0.0 0.0 3.|-- 10.67.5.21 0.0% 1 6.4 6.4 6.4 6.4 0.0 4.|-- ??? 100.0 1 0.0 0.0 0.0 0.0 0.0 5.|-- 10.67.0.146 0.0% 1 7.9 7.9 7.9 7.9 0.0 6.|-- ??? 100.0 1 0.0 0.0 0.0 0.0 0.0 7.|-- 172.21.161.112 0.0% 1 12.5 12.5 12.5 12.5 0.0 8.|-- 172.21.161.106 0.0% 1 7.2 7.2 7.2 7.2 0.0 9.|-- 128.1.62.166 0.0% 1 7.6 7.6 7.6 7.6 0.0 10.|-- 103.140.146.176 0.0% 1 7.2 7.2 7.2 7.2 0.0 11.|-- 23.91.110.94 0.0% 1 7.6 7.6 7.6 7.6 0.0 12.|-- 23.91.110.87 0.0% 1 9.3 9.3 9.3 9.3 0.0 13.|-- 72.14.195.170 0.0% 1 7.9 7.9 7.9 7.9 0.0 14.|-- 64.233.175.107 0.0% 1 9.8 9.8 9.8 9.8 0.0 15.|-- 142.250.58.87 0.0% 1 8.3 8.3 8.3 8.3 0.0 16.|-- 8.8.8.8 0.0% 1 9.3 9.3 9.3 9.3 0.0 |
4. 接入
在中国内地,由gw.gz通过wireguard协议提供接入。
4.1 安装wireguard
• Installation: https://www.wireguard.com/install/#ubuntu-module-tools
| macOS & iOS 客户端须使用外区App Store帐号。 |
4.2 生成服务端、客户端密钥对
| Shell gw.gz# cd /etc/wireguard/ gw.gz# umask 077 gw.gz# sudo wg genkey | tee srv-pri-key | wg pubkey > srv-pub-key gw.gz# sudo wg genkey | tee cli-pri-key | wg pubkey > cli-pub-key |
4.3 服务端配置
• 设备名为wg0,配置示例:
| Shell gw.gz# cat /etc/wireguard/wg0.conf [Interface] ListenPort = 51821 PrivateKey = $srv-pri-key Address = 172.31.254.254/24 MTU = 1380 test-device [Peer] PublicKey = $cli-pub-key AllowedIPs = 172.31.254.9/32 PersistentKeepalive = 10 more peer… |
| 记得配置云网络的防火墙,放行udp 51821端口参考文档:https://docs.ucloud.cn/unet/firewall/guide |
• 启动wg0
| gw.gz# wg-quick up wg0 |
4.4 客户端配置
配置示例:Endpoint为广州服务器公网地址
| Shell [Interface] PrivateKey = $cli-pri-key ListenPort = 51820 Address = 172.31.254.9/24 DNS = 8.8.8.8 MTU = 1380 [Peer] PublicKey = $srv-pub-key AllowedIPs = 0.0.0.0/0 Endpoint = $server-internet-address:51821 PersistentKeepalive = 10 |
5. 正式路由配置
| Shell gw.gz# sudo ip route add 0.0.0.0/0 via 192.168.0.2 dev tun0 table 2 gw.gz# sudo ip rule add iif wg0 table 2 |


如何通过专线网络实现跨境办公?:等您坐沙发呢!